
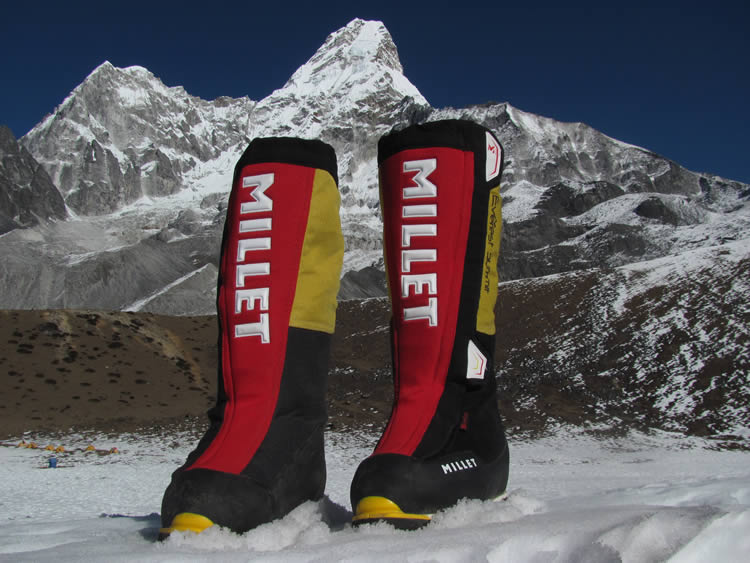
The ‘Everest’ Boot by Millet
they look the part but how do they perform?
I am sure that you are well acquainted with the concept of layering – creating air pockets and trapping layers of warm air between garments – whether that be the upper body, legs, head or hands. By removing or adding thin or thick layers one can regulate ones temperature according to whether you are working hard, standing still at a belay, resting for lunch or whether the weather has changed and it is getting warmer or cooler. It doesn’t take long to whip a layer off or pop a layer on and can make the difference between comfort and misery particularly if pre-empted.
With boots, however, this isn’t really an option. Apart from perhaps adding a gaiter (and even that would generally be on or off for the whole day) what you put on your feet at the start of your day is what you will probably be wearing at the end. So it is vitally important to make sure that a) you have the right sock combination and b) that the boots are suitable for the day’s activity.
In UK summer, Scottish winter or The Alps it is not uncommon for people to have 3, 4 or even 5 pairs of boots that can be swapped and changed according to the weather conditions, the activity being undertaken and the length of day. On Everest (and other ultra-high altitude mountains) however, this flexible approach is not really an option. Yes there is a trekking phase where trainers / approach shoes / light hiking boots might be used, and an acclimatisation phase where plastics might be worn, but for the summit phase nothing but the warmest boots will suffice.
When it comes to the arena of ultra-high altitude the choice of boots is quite limited but that doesn’t mean that you should settle for any less than the best. The main protagonists are La Sportiva (Olympus Mons), Scarpa (8,000ers) and Millet (Everest). It’s quite difficult to compare like for like as they partly depend on the shape of the foot for the individual.
One of the difficulties with high altitude boots has always been a trade-off between warmth and volume. Yes you want to have a warm boot but you don’t want a boot that is too voluminous. Conversely a slim boot will possibly be a bit light on the temperature ratings. Equally the boot has got to be up to the job in hand, be rugged and totally bomb proof. And lastly it’s got to be easy to put on and take off even in the coldest of conditions where one might be wearing big thick mitts where operations are compromised by lack of dexterity.
THE VERDICT
Personally I was never a great fan of the original Everest Millet boot as the gaiter was pretty baggy (great for getting over down covered legs but as they were baggier still there was a lot of potential for snagging crampons with careless footwork) and the boots were pretty floppy compared with the original Scarpa 8,000ers and La Sportiva Olympus Mons (please see here for the latest Olympus Mons Evo review). But the most recent version has a nice slim look to it and this has been accomplished by using some pretty high tech materials and innovations.
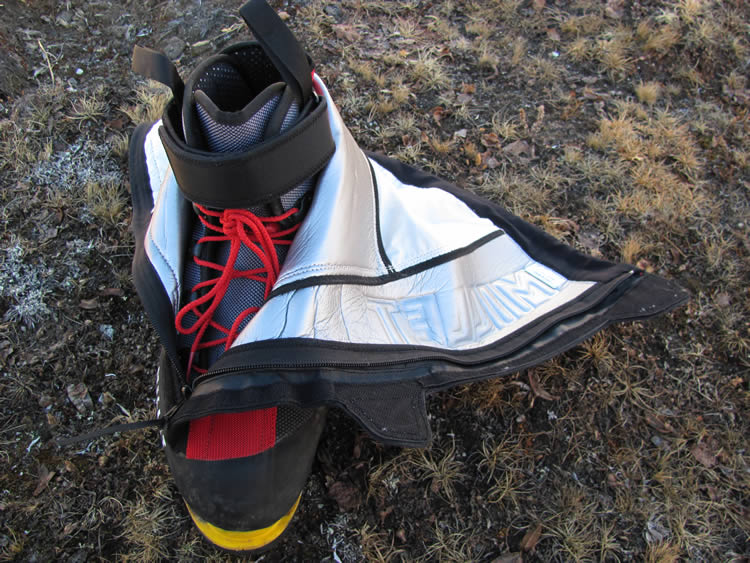
The old style boots had a double zipper up the front of the integral gaiter which meant that there were two things that could go wrong. Equally the original Scarpa 8,000er has only a single waterproof zipper which is very stiff and gives a distinct feeling of vulnerability. With either of these boots if the zipper pops there is no plan B. Even abandoning the summit attempt and retreating down the mountain will be a difficult task with a boot that has a front open to the elements and snow.
The La Sportiva Olympus Mons has a Velcro fastening protecting the zipper behind but the Millet Everest has gone one step further with some industrial strength Velcro complete with pull tabs that protect a deep seated zipper that opens way down to the front of the boot. This makes opening and removing the boots a cinch. It also really helps when popping the boots on especially with the handy over sized pull loops that are on the inner boot (on the sides) and the outer boot (fore and aft).
The gaiter is nicely slimline and very hard wearing (similar to the Scarpa 8,000ers), is a massive improvement on the previous version and better that the (old) Olympus Mons gaiter. I guess there will always be a debate about whether the gaiter on any of these boots should go under or over the down. If it goes over and is too slimline then it may well compress the down and create a cold lower leg which, in turn, will cause less warmth to flow to the foot. Conversely if the gaiter goes under then that precious down will come spilling out the moment a crampon comes in contact with it. I’ve experimented with both and I am generally in favour of the gaiter going over the trouser and this is still achievable even with the slimmer lower volume Everest Millet.
And no two ways about it this boot is warm. There are some really great materials that have been used sensibly to create warmth where necessary but still keeping the volume down by not having the boot too over speced. There’s silver this, laminated that and insulated the other that all work together to create a boot that will almost undoubtedly cope with the worst that will be thrown at it in the ultra-high altitude environment.
Having said that the boots can only be warm if they are supplied with a heat source so, as with all double boots, it is well worth keeping the inners in your sleeping bag during the night (a cold boot will make your foot cold before your foot can make the boot warm) and if you have poor circulation (which will be doubly compromised by the lack of O2 at altitude) then a warm up sachet or electric foot bed would still be advised.
There are a few downsides though. The first problem I encountered was that the gaiter doesn’t quite open enough to enable the outer boots to be laced fully and invariably they therefore felt floppier than they ought to have. Yes you can peel the gaiter right down but in time this is only going to damage the tough materials that are there to protect the boot and retain warmth. The second observation about the laces is that they aren’t laces … but pieces of red string! They don’t tie well and they loosen off easily (on that note always replicate the conditions that you are going to use your gear in when trying on. So don’t just be content in the shop where things are easy to do – have a go with mitts or thick gloves on if you don’t believe me). The outer ‘laces’ would really benefit from having the same speed lacing system that comes with the inner booties.
The next issue is that they haven’t quite got the dimensions right for the rear crampon clip. The recess where the heel clip engages is slightly too far forward (or the back of the boot where the heel of the foot lives is slightly too far back) – but either which way it is difficult to get a really comprehensive ‘kerthunk’ when putting your crampons on. It’s more of a ‘kerphht’. When using crampons that have a plastic ‘y’ cup at the toe it is highly unlikely that the boot would ever become dislodged from the crampon but even so I’d prefer a better boot / crampon suitability – and I experimented with 7 different models of crampon so don’t blame me, or the crampons, because I can get them all to fit nicely and snuggly with my Scarpas (8,000ers & Vegas) and La Sportivas (Baturas and Nepal Top Extremes).
Another issue that I have come across since this initial review is that I have encountered quite a few people who have had to cut away at the side of the heel on their Everest Millets to enable their crampon heel clip to fit properly. Basically the heel is so wide that the bars going form the heel clip to the base of the crampon are forced apart or, worse still, end up in a spongy arrangement where they are being forced down by the heel box.
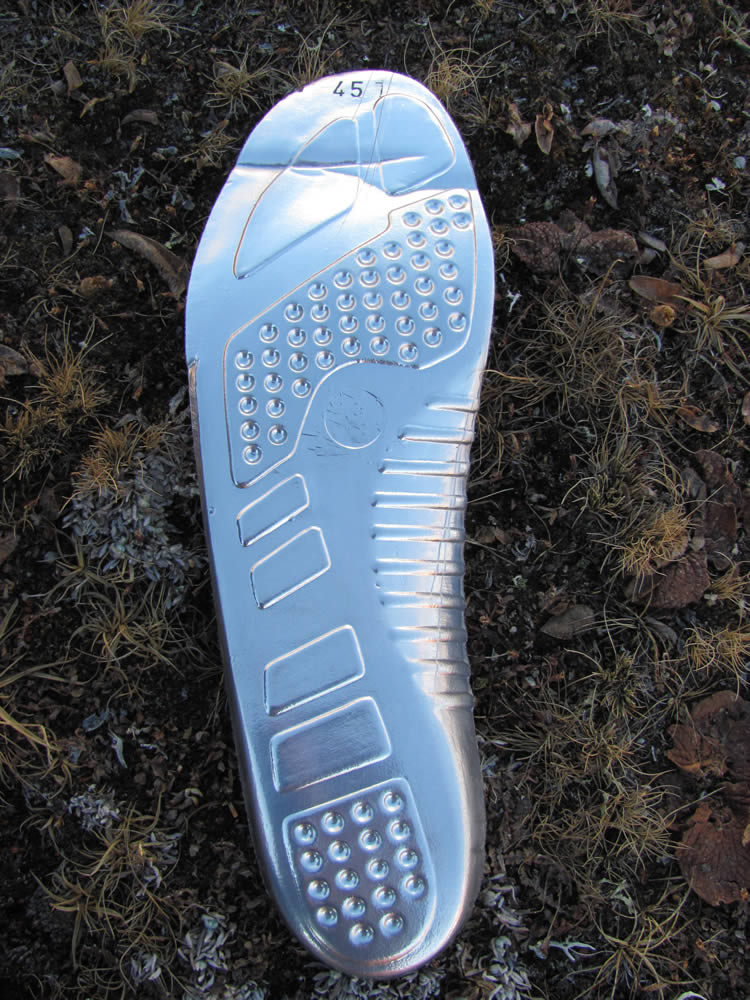
My last niggle is that the super high tech footbed in the inner boot creased towards the front of the foot the first time that I used them for going downhill. They are perfectly the right size and are a super fit so it’s not my foot that’s to blame. I guess I’ll have to strengthen them somehow (or replace them) but they definitely seem to move around when in use which is a real shame.