
Using ‘Fixed Ropes’ on
Big Himalayan Mountains
– an essential guide.
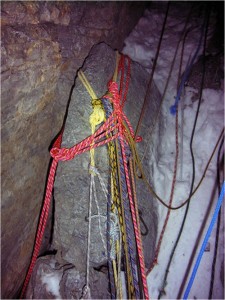
Everest summit day – Which rope do you clip?
Whether you love or loathe the idea, a lot of the big mountains usually have sections of what we call fixed ropes put in place to allow expedition members, Climbing Sherpas and High Altitude Porters to progress up, and down, the route safely.
It is usually easier to equip sections of the mountain with rope that is secured in place, than to have people climbing together either Alpine style or swinging leads. The Alpine approach is a very pure way to climb a peak – but if one person needs a bit longer to acclimatise then it can jeopardise the summit success of that team of 2 or 3 climbers.
Hence fixing ropes – which then allows individuals, or small teams, to move about the mountain and develop individual itineraries according to how folk are feeling, whether they want to rest, push ahead, team up with another person etc.
Arguably fixing ropes reduces the skill level of those people who are then going to attempt the peak – which then increases the need for ropes to be fixed! But nowadays these people are probably going to go there anyway and their lack of mountaineering experience makes them a liability not only to themselves, but to everyone else around them.
Then there are the Climbing Sherpas and HAPs to consider. They are the backbone of many expeditions and without them being able to ascend and descend quickly, and safely, your logistics and supply chain would quickly fall apart. And the chance of any rescue bid being mounted in the event of an accident, people having problems due to extreme altitude, a change in the weather or equipment failure would be an absolute non-starter.
When used properly they are a very safe way for people to protect themselves – when used improperly or when ignored then you can only imagine what the consequences might be.
There are a whole range of methods that you will come across for dealing with fixed ropes. If you ask 10 expedition leaders about using fixed ropes you’ll probably get 10 different answers. They’ll all agree on a few issues but opinions will differ and be divided on many matters and every method has its pros and cons (some methods only have cons and you will be amazed what you see people doing in the name of safety).
I have developed a system over the years that most people are able to comprehend and use and it works for every situation that you may come across. The key here is to keep the system simple and versatile. It can be picked up by even the most inexperienced novice but I would always advise that you already have a certain level of understanding about climbing and abseiling techniques. Learning skills is all very well, but putting them in to context has got to be better.
Equipment that you need:
- A harness
- A Figure of 8 (check out the Black Diamond Super 8 which is one of the best and lightest on the market)
- (Alternatively a belay device with big slots to ease rope threading and a big retaining loop to lessen the drop factor – Petzl Reversino, Reverso and Reverso3 as well as the Black Diamond ATC Guide are recommended)
- Cow’s tails – I use a 4 metre section of 9mm dynamic rope
- 5 x locking Karabiners. HMS / Pear Shaped Karabiners preferred due to ease of use with gloves on and wide gate opening (but NOT the old DMM Boa – they don’t fit through the holes in the jumar). ‘Autolocking’ style karabiners are NOT recommended.
- Ascenders (jumars): I highly recommend handled ascenders. You need to make sure that you can get a gloved mitt in to the handle area though so don’t go overboard with the mitts. The best device is probably the Petzl Handled Jumar whereas the Black Diamond ones (Nforce Ascenders), with their extra moving parts, have been known to freeze up.
Some of the fixed ropes that you come across on these big mountains are quite thin so it is best to steer clear of the likes of Petzl Tiblocs. Also, the dropability of small devices like the Wild Country Ropeman makes them unsuitable too. And that’s because you also need to have:
- A pair of thick gloves or mitts.
- An 8ft (120cm) sling and some prussiks.
GENERAL
To make your cowstails use a 3.5 to 4m section of 9mm dynamic rope to create a ‘long’ arm and a ‘short’ arm.
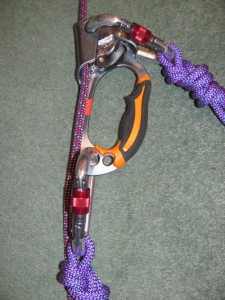
What you need to do – tie a figure of 8 on the bight, with a stopper knot, on each end of the rope. About 8 inches from one end tie an overhand on the bight (this side will become your short arm). Now clip a karabiner and a jumar in to what will become the short end and then clip the karabiner on the other end of the cowstail in to the top holes of the jumar (see Fig below). This then gives you your halfway mark – where you tie an overhand knot on the bight to allow you to larksfoot the cow’s tail on to your harness thereby dispensing with the need for a karabiner (less weight) and you also know that once it’s on it can’t come undone.
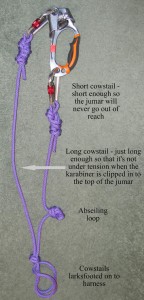
You have now created two arms which means you have 2 attachment points which will allow you to jumar up and pass any knots and anchors (rebelays) along the way always attached with at least one point of contact. Later you can then use both arms for clipping in to the ropes with karabiners when descending.
On the short arm the additional loop (created by the overhand knot on the bight) is used for your abseil device when coming down steeper sections in addition to having the 2 karabiners at the ends of the arms clipped in as well.
Why not use the belay loop for abseiling you may well ask? Well there are 2 reasons – firstly is that with all that down clothing on it can get a bit busy and difficult to visually make sure that everything is attached correctly, whereas the loop you have created will keep the Fig 8 / belay device away from your waist and visible at all times. Secondly it means that if I want to back up the abseil with a prussik / autoblock then you have created a high attachment point and can then put the prussik on the belay loop rather than the leg loop.
Using the leg loop for the prussik / autoblock may well be fine in certain situations when cragging, but there is always the possibility that you may raise your leg sufficiently high to disengage the prussik against the belay device and start sliding. Particularly so with a big rucksack whilst wearing goggles negotiating down awkward steps at night when there would be more tendency for you to have to rotate to get a good view of the terrain.
GOING UP
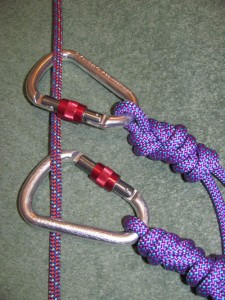
Easy Ground – There are many sections where the angle may well be quite benign and only require the clipping of a karabiner (or two). If you can save 30 seconds here and 20 seconds there then, throughout the course of a day, you’ll save an hour – and an hour by day becomes 2 hours by night. To that end there isn’t a need, necessarily, to do the karabiners up.
- As long as you are using them both at the same time you can clip one up and the other down and immediately the gates are opposed – so you can’t have the rope crossloading the gates and inadvertently unclip both of them in a fall situation.
Having said that, there may be times when you feel more comfortable with them being screwed up (ladders over yawning chasms for instance) – in which case doing them up may be prudent.
You can now approach the next anchor, make yourself comfortable and balanced, assess the terrain above you (any objective danger?), assess the anchor, assess the next section of rope, unclip one karabiner and immediately clip past the anchor, unclip the other karabiner and clip it on the rope in an opposed manner (i.e. one clipped up and the other clipped down) and continue along the ropes. Initially this may take a minute or longer (especially if you are undoing and relocking karabiners or with mitts on) but with practice this will take only a few seconds.
- If there are numerous ropes available to clip then select a few that look like they are suitably new and unworn.
- If it happens that you pop round the corner and some of the ropes you have clipped disappear in to the ice then just treat the situation as if it were a rebelay and unclip and reclip accordingly.
You can now make your way safely negotiating the terrain and clipping past the rebelays, one karabiner at a time.
- The cowstails have a tendency to get wound around each other after a while of unclipping and reclipping so every so often just unwind them.
- You also need to make sure that you don’t pass the cowstail around the back of the previous rope and anchor when clipping on to the next rope – otherwise you’ll only get 2ft and the ropes will come tight.
Steeper ground – when there is the potential that a slip will become a slide which may become a fall then it’s time to deploy the jumar. Sliding down to the last anchor point, even with both karabiners attached and opposed, is not to be recommended.
So … at an appropriate juncture (usually the rebelay before the steep section) get yourself in to a balanced position and, if appropriate, make yourself safe by clipping the long cowstail karabiner in to a closed loop of rope or the anchor itself.
- It’s very important to inspect the integrity of whatever you are going to be clipping in to because this will be your sole attachment point for the next few minutes. Make sure it is not just a ‘loop’ that is actually created because the rope is just stuck in the snow or by the end of a rope being tidied away behind a rock or the anchor itself.
You’ll now need to deploy your jumar on to the short cowstail.
- This should be suitably adjusted back home, or at Base Camp, to be just short enough that the jumar will never be out of reach. Better slightly too short than slightly too long.
- It is imperative that you do up the locking karabiner attached to your jumar as this is now your main point of attachment to the ropes in the vertical environment.
Open the jumar up, snap it shut on to the rope, move it up as far as it will go and gently weight the rope to make sure that it seems to have integrity.
Once you have decided that you feel safe to commit to the rope then unclip your long cowstail karabiner from the anchor point and clip it in to the holes located at the top of the jumar.
- When you do this ensure that the karabiner is not only clipped in to the top of the jumar but that the rope is also captive within the karabiner as well (see photo).
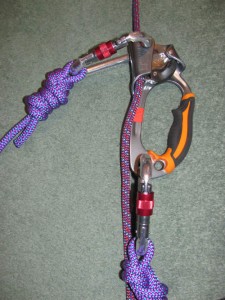
Correct – the top karanbiner is through the holes in the jumar AND the rope is captive within the karabiner as well.
Incorrect – the karabiner does not contain the rope as well as being clipped in to the top of the jumar
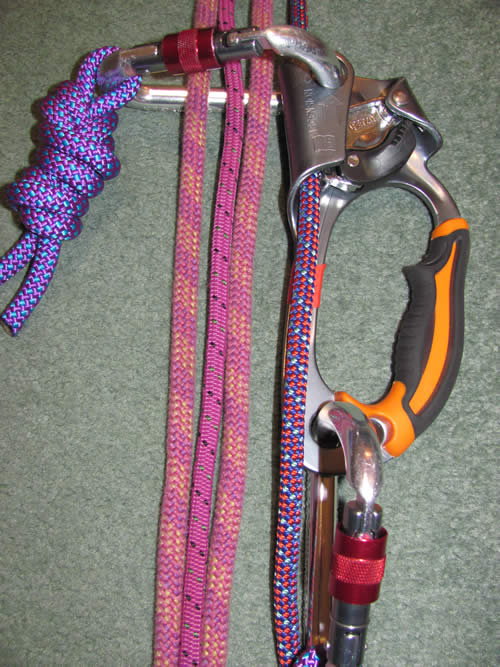
- If there are numerous ropes then the jumar can only be attached to one of them (the best one) – but the long cowstail karabiner can through the holes in the jumar and go around the other ropes.
You can now jumar (don’t forget to rest when / if appropriate) up to the next rebelay. Make yourself comfortable and balanced, assess the terrain above you (any objective danger?), assess the anchor, unclip the top karabiner from the jumar and clip in to the anchor if appropriate.
Unclip the jumar from the lower rope, pop it on to the next section of rope, slide it up the rope, weight it, unclip from the anchor with your other long cowstail and pop the karabiner through the top holes of the jumar and continue on up. Sounds complicated but with a bit of practise it becomes an easy routine.
Even steeper terrain – it’s time to deploy the second jumar. Contrary to what you may think the jumar on the long arm of the cowstail actually goes below the jumar on the short arm. Why? Because otherwise the jumar on the long arm will keep going out of reach and you’ll waste extra effort to keep getting to it.
Once you have both jumars on the rope you need to pull down on both and then immediately move the upper one smoothly up the rope. You then rest on the short cowstail and move the lower jumar up the rope at leisure. Repeat as necessary.
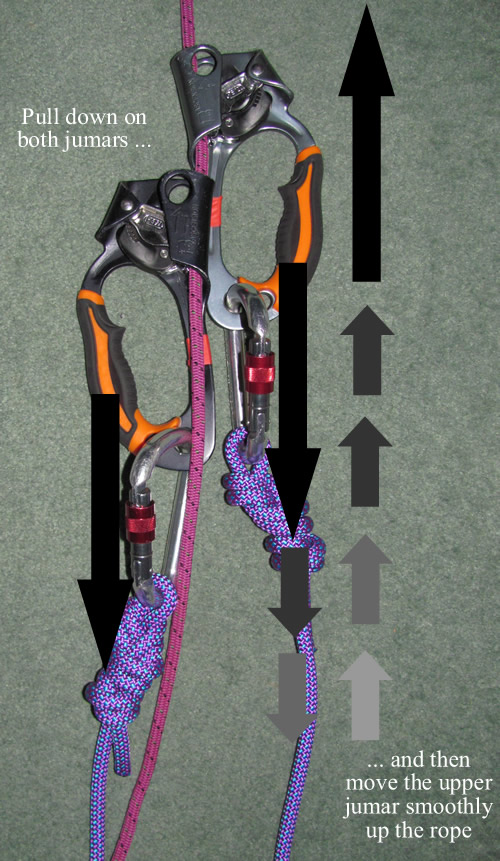
- If you push in line with the rope it will slide a lot more easily than if you apply any sideways force.
- Avoid creating any slack rope. The classic situation is when people pull down on both jumars and then are precariously tensioned with bent arms.
- Pull down on both and then move the top jumar up all in one swift, smooth action.
- And then rest.
When you get to a rebelay and have made the usual checks (stable, checked for objective danger, checked the anchor and the next section of rope) then clip the bottom jumar (or its karabiner) on to the anchor (or next section of rope). Transfer the jumar on the short cowstail on to the next section of rope, weight it, transfer the other jumar so it’s below the short cowstail (or if the angle has eased – stow the jumar and clip the karabiner on the long cowstail in to the top holes on the business jumar) and keep on going.
Enjoy the summit!
REMEMBER
- Always maintain at least one point of contact
- Make sure you are in a stable position when unclipping / reclipping
- Check above you for objective danger / other climbers.
- Considering waiting and have a drink rather than proceeding up, particularly if people are descending on the same rope
- Always ensure that you are clipping in to ropes that have integrity.
- If you can save time by being swift and efficient with your ropework (but without compromising safety) you will get to the next camp that bit earlier – you can then get a brew on and be less likely to become dehydrated.
- Don’t jam your jumar up against any knots in the rope. To release the jumar you need to be able to pull the catch down and move the jumar ever so slightly upwards to release the teeth form the rope.
GOING DOWN
So far we have covered the set up for your cowstails and how to use them to get to the top of your chosen mountain. Now it’s time to get down. Safely.
Firstly I advocate always using both karabiners that are on the arms of your cows tails. You may well see other folk just clipped in with one karabiner, but this means that they will possibly have to compromise their safety at any rebelays or when passing anchors. I know that it only takes a moment to transfer the karabiner – but it only takes a moment to get hit on the head by a stone and lose control. What are the chances of that? Well put it this way, the chances of winning the lottery are 13,000,000 : 1 and you know what? Someone wins it almost every week.
There are a couple of ways that you may wish to descend but there is a delicate balance between speed and safety that needs to be considered. If you abseil every section of fixed ropes then you will find it is slow progress and you will become more tired after an increasingly long day. If it takes so long that night falls then in the darkness you will find it more difficult to discern where the route goes and this, in turn, will make you slower still and much more prone to making an error in descent. It is a well known fact that errors in descent are very unforgiving. So whilst safety is paramount, speed does become a safety issue. 10 seconds here and 20 seconds there will soon become an hour. An hour by day will become 2 hours at night.
Descent – Easy angled terrain
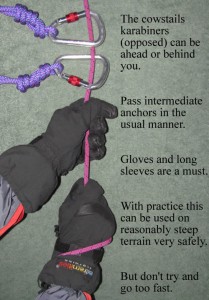
When the angle is slight (and this depends on your threshold as to what you consider to be acceptably slight) and you can see the next anchor (or you can remember that the route doesn’t suddenly get unexpectedly steeper) you can use your cowstail karabiners and your hands (gloves a must) to safely descend easy slopes. You clip the karabiners on to the rope (opposed – one up and one down) and simply walk down with a hand constantly trailing along the rope.
- Don’t get blasé about this or relax your guard – you must be constantly attentive to subtle changes in the angle of the terrain or the texture of the snow that you are walking on.
When you get to an anchor simply get yourself in a balanced, stable position, assess the terrain (it may be easy angled but you still need to be aware of what may be above you or off to the side), assess the anchor, assess the next section of rope and, if you’re going to continue in the same vein, unclip and reclip your first karabiner and do the same with the second (make sure they are opposed).
- It may be prudent when descending to step down past the anchor so that you are then below it before committing to transfers. That way you aren’t stooping forward to grab hold of the next section of rope which will put you out of balance.
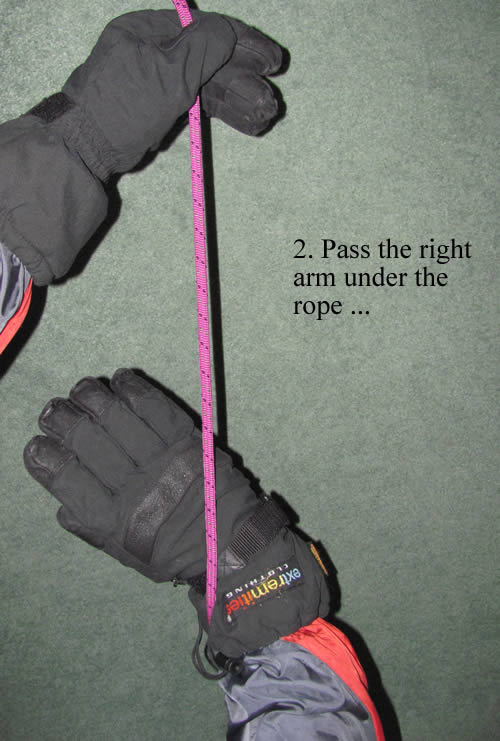
Descent – Steeper terrain
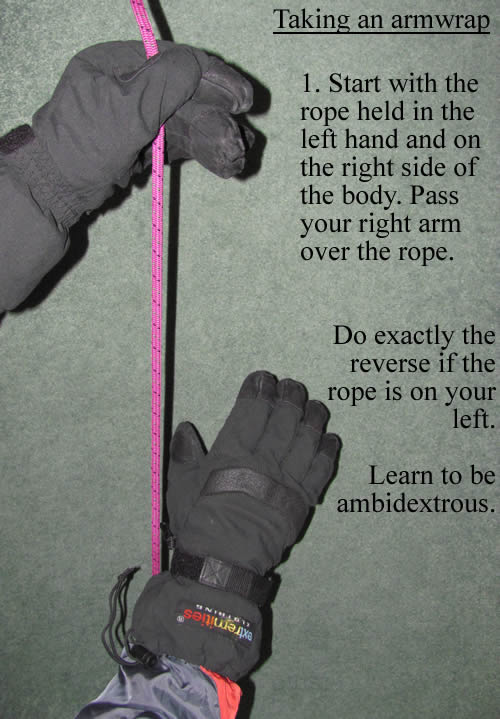
When the angle becomes steeper (again this depends on your threshold as to what is steep) and you can see the next anchor (or you can remember that the route doesn’t suddenly get unexpectedly steeper) once you have clipped both karabiners (opposed) on to the next section of rope then you can take an arm wrap (gloves a must as well as a long sleeved top).
If the rope is, say, on your right hand side then hold it in your left hand with it under your right arm pit (so it is between your right arm and your torso). Rotate your right arm around, under and then over the rope in a clockwise fashion with the rope then coming out of your gloved palm and across your forearm (exactly the opposite if the rope is on your left). You can now progress down the hill with the rope sliding through your left hand, through your right hand and across your right forearm. If you need to stop simply increase the grip that you have with both hands.
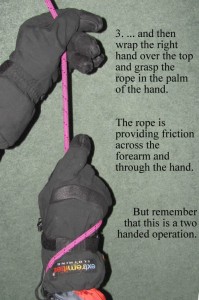
This is a very simple technique that allows you to commit to reasonably steep slopes but maintain some momentum (as soon as you are committing to using abseil devices this really eats in to your time). Having said that, be very aware of when it is appropriate to change techniques as and when the ground demands it.
- Don’t copy what other people are doing. Just because they are doing an arm wrap doesn’t mean that you have to. It may be that they are more used to the terrain than you. Or it may be that they are only just getting away with it and don’t realise the potential danger they are in.
- Don’t forget to constantly monitor your descent and body position. If you get to a small awkward step which is going to be difficult to negotiate facing forwards then stop, carefully alter your body position so you’re facing back up the hill, grab the rope with both hands (bent arms advised), ease your way down the step using a combination of allowing the rope to slide through your hands and straightening your arms (extra care required), and then, when you’re back on to appropriate terrain face forwards, take the arm wrap and continue down.
- Arm wrapping is not a one handed technique.
When you get to the next anchor do the usual – get yourself balanced (consider descending so you are below the anchor), assess the terrain above you, assess the anchor, assess the terrain below you, transfer the karabiners one at a time (opposed), take another arm wrap and down you go.
Descent – Very steep terrain
Lastly – we are in to full on abseiling mode (either with or without a prussik as a back up depending upon your ability, whether you can see where the route goes, whether it is dark, whether there are other people around and whether there is a danger of rock fall or of you accidentally losing control of the rope).
- A belay plate is great BUT they do tend to kink the ropes because the ropes are usually(!) but not always (!!) attached at the bottom end and this means that a great messy snake can develop towards the bottom anchor when abseiling which you won’t be able to get through your abseil device.
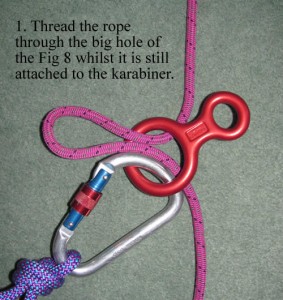
A better alternative (addition) to your repertoire is the good old Figure of 8.
- The unfortunate thing with is the dropability factor Fig of 8 especially when wearing big gloves or mitts.
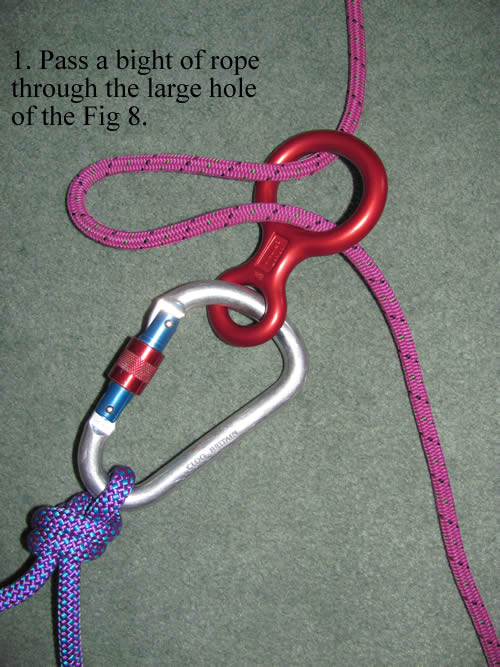
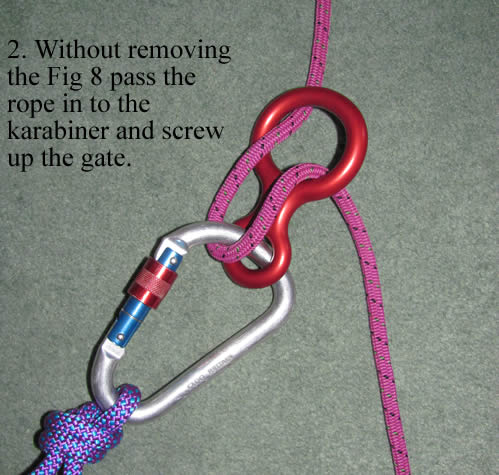
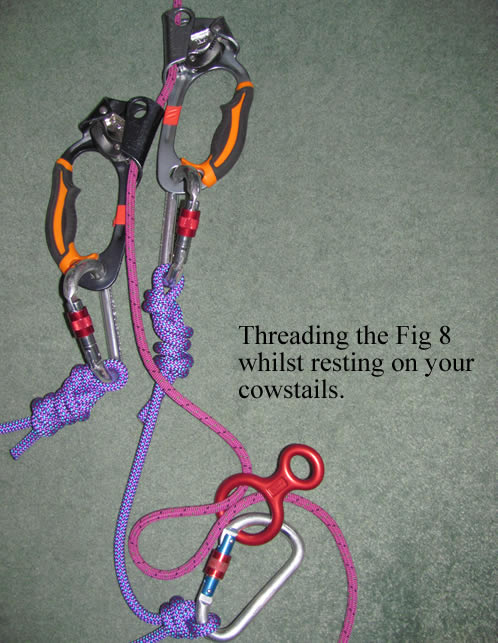
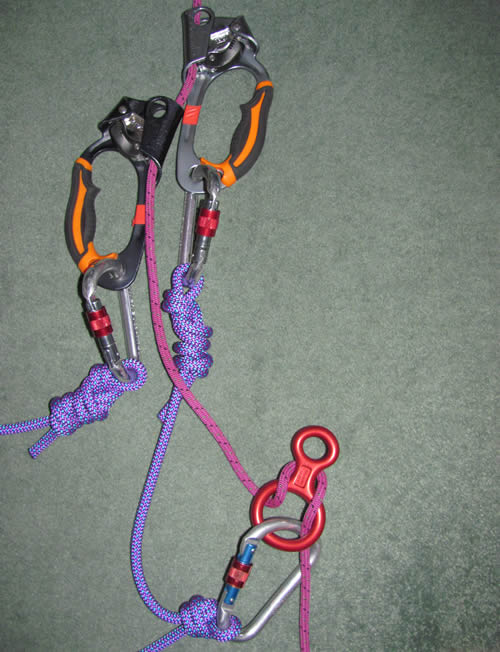
This can be addressed as follows – have the LARGE hole hooked on to your abseiling karabiner (with the karabinber clipped in to the abseil loop on your cowstails). Without removing the Fig 8 from the karabiner thread the rope through the large hole and over the top of the Fig 8. You can then remove the Fig 8 from your abseil karabiner safe in the knowledge that it is now attached to the rope. Invert the Fig 8 and clip the small hole back in to the karabiner. You MUST do the karabiner up.

- For experts only . you could even miss out the inverting stage BUT this is not as safe as there is a possibility that the rope could potentially come unlooped if you brushed against some rocks whilst the rope is unweighted.
Pull some rope through the Fig 8 and step UP towards the anchor. Without lowering yourself too far that the cowstails become taut you need to make sure that the Fig 8 is correctly threaded (does it hold?), release a little bit of rope (does it slide?) and then lock off (does it stop?). You then keep hold of the controlling rope, reach up and unclip your cowstails one at a time and clip them on to the rope below the Fig 8 so that they are opposed.
- This is where you need to make sure that the abseil loop you have created is not too close to the end of the cowstail or there won’t be enough slack for you to clip your karabiner on and off the rope.
- If you clip the karabiners above they’ll invariably slide over the top of the Fig 8 at some stage and this could affect how it operates.
- Make sure that when you pull some rope through, and step up towards the anchor, that the Fig 8 is correctly aligned within the karabiner and that it isn’t crossloading the gate.
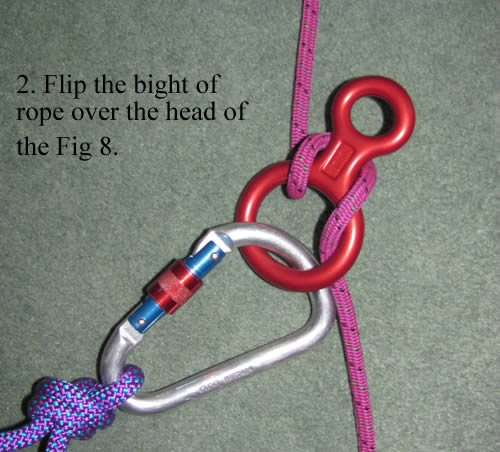
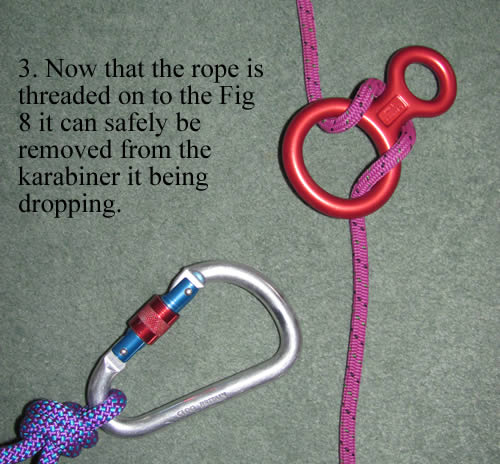
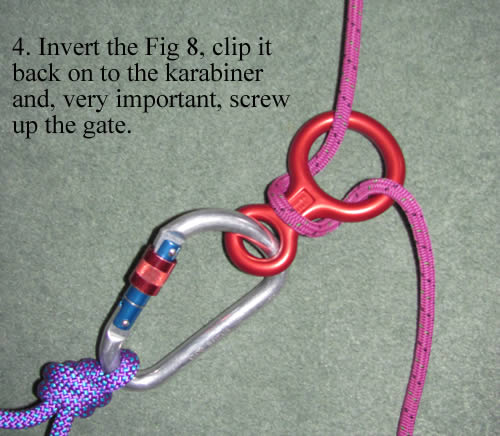
Abseil to the next anchor, get yourself in a balanced position so that you are below it, assess the terrain above you, assess the anchor, assess the rope and terrain below you (what technique are you going to use next?). If you are continuing to abseil then unclip the Fig 8, invert it and clip it back on to the karabiner. Unthread the rope from the Fig 8 by flicking it over the small head and shoulders, reach down for the next section of rope and pass a bight through the big hole of the Fig 8 and over the head. Now that it’s threaded, unclip the large hole of the Fig 8 from the karabiner, invert it, clip the small hole and do the karabiner up. Pull the rope through and step up, does it hold?, does it slide?, does it stop?, and if you’re happy then unclip the cowstails one at a time and reclip them below the Fig 8 and continue your descent.
An alternative method is to have your Fig 8 permanently clipped on to a karabiner through the small hole. Thread a bight of rope through the big hole and, without removing the Fig 8, clip the rope straight in to the karabiner. And do up the gate.
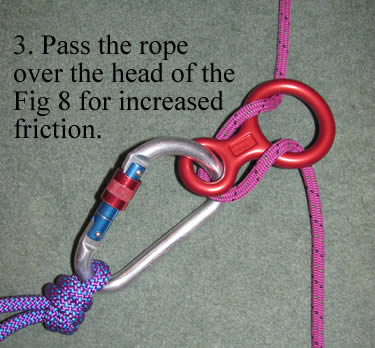
You can increase the friction by passing the bight of rope over the small end of the Fig 8 (again, without taking it off the karabiner).
This is a classic canyoning technique but is best used with a Petzl Pirana – a specialised Fig 8 style device with extra arms for increasing the braking effect.
- Best not to confuse these techniques. Learn one and use it. Don’t swap from one technique to the other because this is no time to inadvertently drop your device or get it threaded incorrectly – or indeed find that it is not threaded at all.
If it is particularly steep and treacherous, or if there is any danger that you may lose control of your descent (falling rocks etc), then you may want to consider the use of a French prussik (autoblock) as a back up. You still use the Fig 8 on the cowstail, so that it is extended away from the body, which allows you to pop a karabiner through the belay loop on your harness and attach an autoblock below the abseil device.
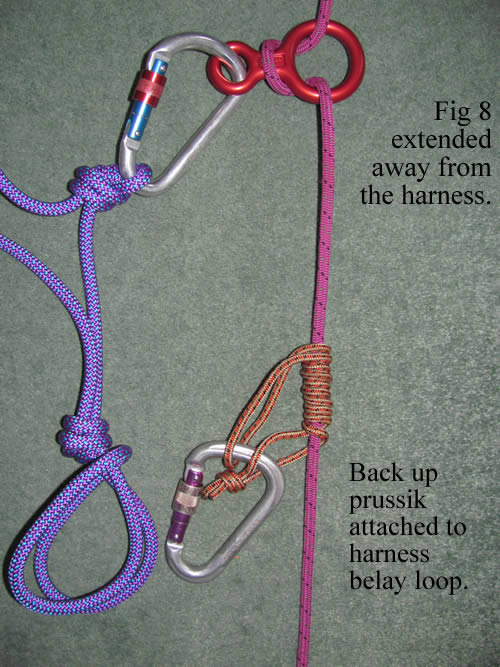
- Because the distance is set, then the autoblock can’t inadvertently nudge against the Fig 8 (or belay device) and open up rendering it useless – which can sometimes happen if you have the Fig 8 on the harness loop and the back up prussik clipped in to the legloop.
Consider the following :-
- It is possible to thread two ropes in to a Fig 8 / belay plate BUT only do this if you can see that both of the ropes go to the next anchor. You don’t want to have 2 ropes in your Fig 8 only to discover that one of them disappears in to the ice half way down the pitch. Not the best scenario to have to start working out how to solve half way down a pitch.
- Try pulling the rope up and if there is resistance then it is probably attached at the bottom. Having said that the resistance may be because the rope has been buried in the snow if it’s been blowing a bit. If you can’t see the bottom of the rope then keep a very wary eye on proceedings. There have been a numer of accidents over the years that can only be attributed to user error (incorrectly threaded Fig 8) or abseiling off the end of a length of rope. DO NOT BECOME ANOTHER STATISTIC.
Descent – Very steep terrain but without enough slack in the rope to thread a Fig 8
This is my least favourite piece of advice because if it is used incorrectly then the consequences are catastrophic. But it is a necessary piece of information because there may be a situation where, because the rope is taut, you just can’t thread the abseil device but it is too steep for an arm wrap on its own.
So . we might use a prussik and the cowstails to back up the arm wrap (facing out), or you may even be facing in and almost adopting an abseiling position.
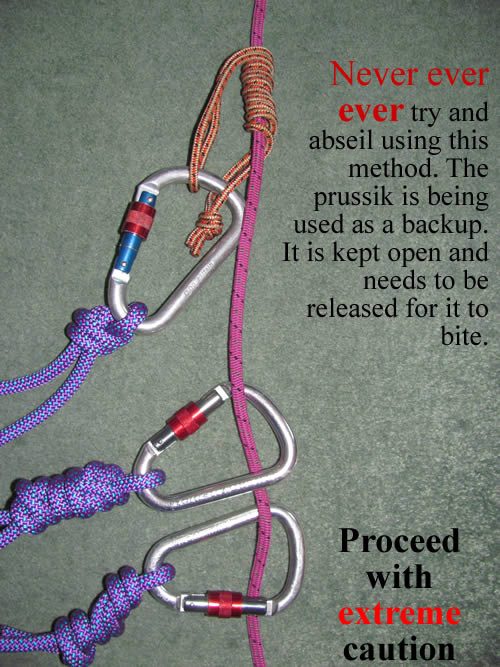
- This is a very grey area and must be approached with extreme caution. The prussik IS NOT for you to abseil with. It is there being kept open by one hand, sliding freely down the rope, and is a back up if things get a little out of control or you need to stop.
At the anchor (using your abseiling attachment loop on your cowstails) you wrap the prussik autoblock style around the rope enough times that it will grip (this varies depending on diameter and texture of rope and diameter and material of the prussik). Step up towards the anchor, nudge the prussik UP the rope and (without letting go of the controlling rope below you) weight it (does it hold?), whilst still gripping the rope below the prussik nudge the top of it with your other hand (does it release?) and then let go of the prussik (does it stop?).
- If it won’t grip then add a loop, whereas if it doesn’t release then drop a loop.
- This is an advanced method and YOU MUST be aware that you are not abseiling. You are gripping the rope below the prussik and at the same time with your other hand you are half gripping the rope and half holding the prussik open. If you get in to difficulty you need to let go of the prussik (and possibly nudge it slightly up the rope) for it to grip.
- Consider fixing a new section of rope if there is some available, or somehow generating enough slack in this section of rope to allow a Fig 8 to be threaded (perhaps by feeding excess rope from the section above (or below) through the anchor knots).
- If you try and use the prussik as you would an abseiling device it will melt through and you will die.
PASSING OTHER CLIMBERS
On some of the more popular peaks you may inevitably find yourself having to pass other climbers. Whether you are both going up, both going down, or travelling in opposite directions Rule 1 is that you must not compromise your own safety. Rule 2 is that it is easier (and safer) to pass at anchor points than part way along a rope. Rule 3 is that you can’t abseil a weighted rope so if someone is jumaring up a rope you want to abseil down then you are probably best off waiting until they have cleared the rope (consider having a bite to eat and a drink).
Both going up
If you’re both ascending and you want to pass the person in front then, once past them, you are under an immense amount of pressure to make sure that you don’t then hold the person up who is now behind you. Sounds easy in the comfort of your living room, but on the hill you could well be making life breathtakingly hard for yourself.
- Before you try and pass ask yourself whether it would be better to slow down for a short while and wait to pass at the next anchor point.
- It doesn’t do any harm to speak to the other person and ask if you can pass. Perhaps they are hoping that you will pass and relieve them of the pressure.
If they are clearly going slower than you, and you feel confident that you can clip past them in reasonably good time, just treat their jumar as being an anchor and clip past accordingly (but don’t start clipping in to their cowstails!). So get alongside them, get balanced, assess the terrain, unclip the karabiner from the top holes on your jumar and clip it onto the rope above their jumar. Release your jumar and place it on the rope above their jumar and then reclip the karabiner on your long cowstail in to the top holes of your jumar with the rope captive inside it.
Both in descent
When you want to pass someone and you are both descending then, unless they have stopped to take a photo or have a breather, it is almost definitely best for you to wait until you both arrive at the next anchor point. You won’t both be abseiling (you wouldn’t be able to descend with them weighting the rope below you) so you’re probably on an arm wrap. But if you have to pass midrope then get alongside, make sure you are balanced, assess the terrain, unclip and reclip one karabiner at a time and then continue down.
- You now have a climber above you (presumably just on their cowstails) and you are also just on your cowstails. Don’t put yourself in to a situation where the person behind you might slip and slide down the rope with you as their buffer.
You’re going up and they are going down
Again the assumption here is that it is easyish terrain because you shouldn’t start jumaring up a rope if they are abseiling down. So let’s assume that they’re on an armwrap and you are using a single jumar. Get close to each other (perhaps you can stop a few yards early if there’s a convenient passing point) and decide who is going around who.
- Don’t compromise your safety.
If they are going to pass you then stand still (or lean out of there way if it’s going to help – depends whether you are both on the same side or opposite sides of the rope) and let them fiddle with their gear.
If you’re going to pass them then pass as you would an anchor. Remember, however, that they are not statically fixed to the rope (say, with a jumar) but are on their karabiners. So if you get this wrong and lose your footing you will slide down the rope above them, take them off balance and you’ll both be whizzing to the previous anchor.
- That person may well end up punching you!
You’re going down and they are going up
Again we’ll assume that you are on an armwrap and they are on their cowstails or using a single jumar. Meet at an appropriate juncture, decide who is going round who (make your mind up as they approach you as to whether they look competent or not). If they are on a jumar then the easiest and quickest thing to do may be for you to unclip and reclip past them a karabiner at a time and continue down on your way. But if this is going to be awkward for you trying to lean down and clip past them then let the other person work around you.
CHANGING FROM ASCENT TO DESCENT
This is a critical skill that you need to have in your repertoire but I must admit it is, thankfully, one that I have never needed to use. You may need to change from ascent to descent because of the onset of poor weather, poor health, injury from, say, falling rocks or because a call on the radio has alerted you to a situation developing elsewhere on the mountain.
The only time that changing from going up to going down is really problematical is when you are double jumaring up very steep terrain. So .
Stop where you are,
Clip your Fig 8 in to the abseiling loop on your cowstail,
Thread the rope from below you in to the Fig 8 (using the inverting method described earlier). Once it’s inverted screw up the karabiner,

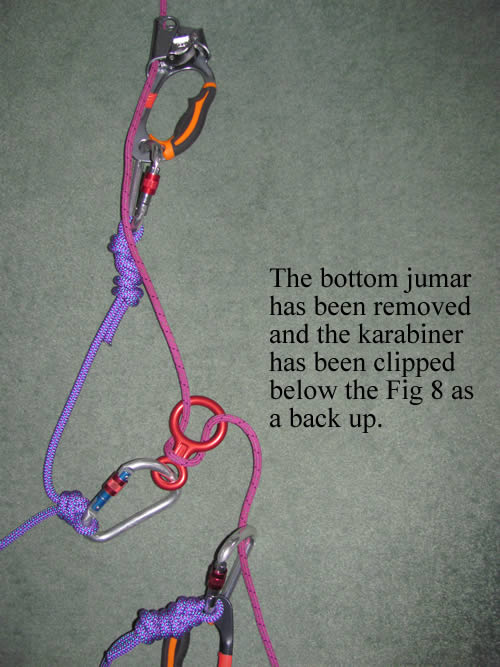
Unscrew the karabiner on your bottom (unweighted) jumar,
Remove the jumar from the rope and, without removing the jumar from the karabiner, clip the karabiner on to the rope below your abseil device as a back up cowstail,
- Make sure the jumar ends up in the bottom of the karabiner on the opposite side to the gate
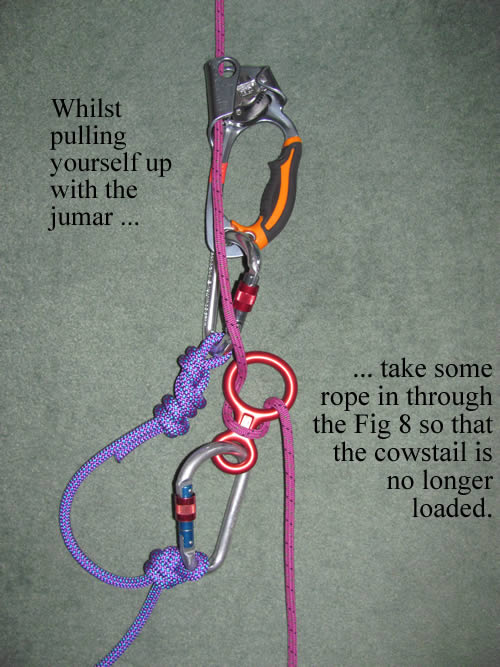
Whilst pulling up on the top jumar pull some rope up through the Fig 8 (similar to moving up to an anchor to test the system when in descent),
Lock off the Fig 8 (check it is threaded correctly, isn’s crossloaded on the karabiner, and will lock off), release a tiny amount of rope (does it slide?) and lock off again (does it stop?),
Whilst keeping the Fig 8 locked off unscrew the karabiner on your top jumar, remove the jumar from the rope and (like just a moment ago) clip the karabiner (opposed) to the rope below the Fig 8 without dropping the jumar,
Abseil down to the previous anchor,
Sort your kit out. If you are going to continue descending then take your jumars off your cowstail karabiners and stow them properly.
REMEMBER
- You need to be wearing gloves for all methods of descent.
- Long sleeves are needed for armwraps.
- Consider stepping down past the anchor before unclipping and reclipping karabiners and Fig 8s.
- Select what you consider to be the appropriate descent technique for the terrain according to your skill level – don’t just copy what others are doing.
- Use the inverted Fig 8 method so you don’t fumble your Fig 8.
- When you can’t attach a Fig 8 because the rope is too taut don’t abseil on a prussik on its own as it will melt. Before using this technique consider if new rope ought to be fixed or if slack can be introduced from above or below.
- Be mindful when passing other climbers.
- Practise (particularly solo abseiling) in a controlled environment.
- Errors in descent are very unforgiving and usually prove to be fatal.